Godot Accessibility Tutorial #2 - How to Build a Blind Accessible Top-Down 2D Experience
Introduction
A top down 2D game like the old Pokemon or Legend of Zelda games may seem like it is impossible for blind people to navigate, but this could only be furthest from the truth. Even without basic accessibility features, blind people learn how to play these games through sheer memorization and whatever sound design cues that they can use to orient themselves. Making such an experience more accessible requires a few systems to work together in a sort of symphony to allow for blind people to have more situational awareness and rely less on sheer memorization, so they can focus on enjoying the game. Essentially, we will be building a toolbox for users to use to experiment with - a toolbox that can be enabled, disabled or customized to some extent. Many of the techniques that you will learn in this tutorial can later be expanded to other kinds of games - the goal is to “think” with accessibility.
Why Accessibility?
A lot of people might think that adding accessibility to your game means that it makes it less fun, or less difficult, but this is not true in the majority of cases. Adding accessibility is really about adding a few basic features to make certain UI elements easier to use for people with different disabilities. These game design choices help make your game not just more usable to people with disabilities, but also other users of your game who will appreciate the different modes that make your game interface more usable. Difficulty can still be retained as long as the focus of accessibility is on the usability of the interface rather than simply the ability to complete a game.
Resources for this Tutorial
For this tutorial you will need the following resources:
- Godot 3.5
You can also reference this git repository to follow along with the contents of this tutorial.
You can also try to apply these types of ideas to the engine of your choice, but this tutorial will only use Godot as an example.
This tutorial is written for Godot 3.5. I will add Godot 4 tutorials sometime in the future when Godot 4 is more stable.
This tutorial assumes you know how to use scripts, attach signals and import scenes.
Designing First
When designing blind accessibility, it might seem overwhelming at first, but sitting down and figuring out what models would work is an important first step. Remember, what we are trying to do is build a system of effects that symbolize things such as location, nearby objects, collisions, friends and enemies, and the like. For now, we will focus on the following structures:
- Footstep Counter - This is a tool that helps blind players count how many steps they have traveled (in video games; this is not generally true in real life!). It can also be used to differentiate areas based on terrain. You can either bind it to an animation or make them based on distance.
- Wall Bonk Sound Effect - A sound effect that plays when you collide with a wall or can’t move in a specific direction. This indicates to the player that they cannot continue progressing in that direction. This is very important - the loss of the wall bonk sound in Pokémon lead to serious usability issues for blind players!
- Collision Proximity Detector - This tool helps blind people detect how close they are to a wall or other collisions. This works best in spaces that aren’t huge open expanses.
- Labels on Overworld Objects and NPCS - This tool tells the player through Text-To-Speech (or optionally voiceover sound files) that they are nearby a certain object on the overworld.
- 3D Sound - This can indicate to players from a distance that there is an object to interact with, as well as add depth and immersion to your accessible experience.
- General Sound Design Improvements - As examples, use a lot of unique sound effects. Use sound effects for every UI action, indicate different actions with different sound effect combinations. Make every action a user can take either sound unique or represent a similar action in different contexts. Programs that can generate a lot of randomized sound effects can be very useful here. Use positional sound effects to increase ambiance and “fill the room”. You don’t need to do everything here, but enough to help make it clear what you are doing from sound memorization alone.
Here are also some other tricks that you can try that are not included in this tutorial:
- Pitch-based velocity - This is a looping sound effect that changes its pitch over time to indicate change, such as a change in player velocity or a change in an HP bar. It’s played in specific instances to provide additional feedback about movement.
- Hallway Detector - This is a sound effect that plays when the player approaches an opening when traversing along a wall. This is a useful addition to the Collision Proximity Detector that, when a collision is suddenly no longer detected after being detected last frame, it plays a sound effect to indicate a hallway has been found. It’s a good idea to indicate junctions, the directions
- Landmarks - These are useful for a lot of people, but can be configured with 3D sound effects to also help blind people find their way around areas.
You can enable/disable all of these tools by adding them to however you are storing options in your game. This way, if you have a specific way you want the visual version of your game to sound, you don’t have to include all of the accessibility sounds as well.
In a sense, we are building a toolbox that allows people to use many different types of feedback to help get critical information about a game that sighted players would usually get from viewing the screen. This toolbox is created by dismantling what is important information about the visuals, and transforming them into something the player can receive either by navigating through TTS strings or, more commonly, sound design. In a sense, its a brand new way to navigate the same game.
Using Audio Buses to Control the Volume of Accessibility Sounds
In most cases, we don’t want to use the accessibility sounds with all players. After all, the beeps and bops of NPC proximity sounds can get very annoying to players who don’t need them, and many game designers might feel adverse to adding these extra sound effects to a game because of how it might impact overall audio design. However, we can use audio buses in Godot to silence these sound effects for players who don’t need them, and activate them for those who do.
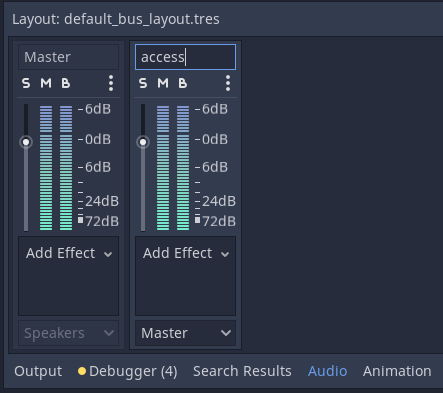
On the bottom of the UI, there is a tab for “Audio”. This tab includes all of the audio bus information for your game. You can add a new bus, and name it something like “access”, and assign as many AudioStreamPlayer and AudioStreamPlayer2D that we want to this bus. Then, when we need to set the volume, we can use the following to set the volume of the access audio bus:
# Set this value to whatever you need to set the bus's volume to
var value_set = 0;

# This gets the "access" audio bus
var index = AudioServer.get_bus_index("access")
AudioServer.set_bus_volume_db(index,value_set)
For this demo, I do not include an options menu, so these sounds play automatically. However, this code is very useful for setting the audio bus volume so only players who need these sound effects have to hear them.
Footstep Counter
A footstep counter is a very helpful accessibility tool. All it does is produce a sound effect when a player has moved a certain distance. This tool allows players to determine with sound alone how distant various landmarks are on a map. Usually, you will only need a footstep counter for the player.
To design the footstep counter for a player, we can add an AudioStreamPlayer node to our player KinematicBody2D node, containing the step sound effect. Let’s name this node Footstep. This isn’t the only way to do this, but it is the easiest way to set it up for the first time.
Now, let’s assume that our walking code in a KinematicBody2D looks something like this:
var direction = Vector2.ZERO
var current_speed = 120;

# This is mostly movement code
func _physics_process(delta):
    # Get the controller/keyboard input strength and direction.
    direction.x = Input.get_action_strength("move_right") - Input.get_action_strength("move_left")
    direction.y = Input.get_action_strength("move_down") - Input.get_action_strength("move_up")

    # If input is digital, normalize it for diagonal movement
    if abs(direction.x) == 1 and abs(direction.y) == 1:
        direction = direction.normalized()

    # Get vector for movement by multiplying speed by direction
    var movement = current_speed * direction

    # Actually moves the player
    move_and_slide(movement, Vector2(0,-1))
This code is functional, but we will need to store additional data to make the footstep counter work - specifically, we will need to store the distance travelled, and how much distance must be covered before a footstep sound is made. To do this, we add the following variables to the beginning of our Player script:
var distance_total = 0;
var distance_max = 40;

var old_position = Vector2.ZERO;
var old_distance = 0;
var current_distance = 0;
distance_total will measure how much distance has been covered since the last footstep, and distance_max will determine how much distance must be covered to make a footstep sound. Additionally, I added variables to store the previous position and current/previous distance travelled. While we can write a footstep counter without these variables, they will make building the Wall Bonk Sound Effect easier later.
Now, we must add the code that will track the distance that our KinematicBody2D has travelled. First, let’s get the distance. For this approach, we will just take the distance from the last position to the current position. To do this, we must update the last position variable before updating the current position with move_and_slide.
# Stores the old position
old_position = position;
Then, after updating the position with move_and_slide, we get the distance between the updated position and the old position. We also update old_distance with the distance travelled last frame, similar to how we store the old_position.
# Stores the old distance from last frame
old_distance = current_distance;

# Gets the distance from the old position to the updated position
current_distance = old_position.distance_to(position)
Finally, we increment current_distance onto distance_total, and once distance_total is greater than distance_max, we can trigger the step sound effect and reset the counter using modulo. It is important that when we reset the counter, we use the fmod function so that there is no error caused by converting from int to float.
# Adds the current distance to the amount of distance travelled
distance_total += current_distance

# If distance total is greater than distance max
if distance_total > distance_max:

    # Reset the distance total by using modulo
    distance_total = fmod(distance_total,distance_max)

    # Play the step sound effect
    $Footstep.play()
Congratulations! You just made your first footstep counter. You can update the stream in Footstep so that you can have different kinds of sounds on different terrain, which greatly enhance both the immersion and accessibility of your game.
Alternatively, you can also include sound effects in your walking animation via the AnimationPlayer node to serve this purpose as well. This will take a little more work, and may not be as precise for measuring distance, but can still serve the same purpose, and can also enhance the sound design of your game to sighted players. To do this, make sure you have an AudioStreamPlayer node that has the sound effect. Then, you can enter the AnimationPlayer, and add sounds in your animation with the Audio Playback Track assigned to your AudioStreamPlayer node.
If you want to have NPCs have footstep counters, such as if you need to know how much distance an NPC has travelled, its important to use AudioStreamPlayer2D instead of AudioStreamPlayer, because this will allow you to use positional sounds with the footstep counter to help the player locate where the NPC’s footstep counter is coming from.
Wall Bonk Sound Effect
The wall bonk sound effect is a sound effect that plays when the player tries to move into a wall or collision. For example, the Pokemon games include this sound effect when you try to move into a wall. This sound effect is one way that blind players can identify where the collisions are in a map. It can be implemented in a lot of different ways, depending on the way that player movement is implemented. For this example, it will be based on if the player tries to move, but barely moves or can’t move at all.
To do this, we will trigger the sound effect under the condition that the player tried to move, but moved only a small distance. This way we can catch small edge cases where a player might slide a small positive amount but does not visibly appear to move. Since we already are tracking the variables for how much distance we are travelling for each cycle, we can easily manipulate this information to see if a player has moved this cycle.
We can insert the following code after we determined the value of current_distance in the example above:
# If there was an attempt at movement this frame
if direction.x != 0 || direction.y != 0:

    # If previous distance and current distance is less than 1
    if(old_distance < 1 && current_distance < 1):

        # Play the bonk sound effect, if its not currently playing
        if !$Bonk.playing:
            $Bonk.play()
What this code is doing is extremely simple. First, it checks if the direction Vector2 is nonzero. This means that some input for direction has happened this cycle. Next, we test if old_distance and current_distance is less than 1. We choose 1 because of some edge cases where move_and_slide may move the KinematicBody2D a very small amount, and we check both old_distance and current_distance to ensure that there has been at least 2 frames where the movement has been less than 1. This accomidates most strange edge cases. Finally, if the sound is not playing, we play the sound - this makes it so that the sound effect loops properly when the player continously “bonks” into the wall.
Collision Proximity Detector
The collision proximity detector is a system that allows blind players to hear themselves approaching collisions as they move around. Unlike the bonk sound effect, it works even when the player is not colliding with a wall. Additionally, because each detector in the system uses a slightly different sound effect, it can even indicate from what direction the collision is coming from as a player approaches it, because it gets louder the closer the player is to the collision.
This might seem like a very difficult thing to build, but it’s much simpler once we realize how to design it. All a collision proximity detector does is as the player approaches collisions, it moves a sound effect closer to the player, which has a sound listener for positional sound. By surrounding a player with 4 of these special moving sound effects, we can indicate how close collisions are based on the 4 cardinal directions. If we use a RayCast2D node, we can detect where collisions collide with the RayCast2D, and move the sound effect to that position, thus making it louder as we approach the collision.
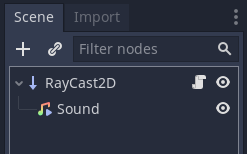
First, we will need to design how each of these special sound effects will work. First, create a new scene, and have it use the RayCast2D node as its root node. This scene will represent one of the collision detectors. Then, as its direct child, we will want to use the AudioStreamPlayer2D node, which creates a positional sound effect.
You will want to set the collision mask for the RayCast2D node to the same mask used for collisions in your game, and make sure that it is enabled. In your AudioStreamPlayer2D node, set the max distance property to a number somewhat less than how far out you are going to set for cast_to - I use 40 in this example, versus a value of 50 for cast_to. Make sure that the AudioStreamPlayer2D is set to autoplay, so that it plays as soon as the scene is loaded. It’s also a good idea to move the position of the AudioStreamPlayer2D to the cast_to position, so that when the scene is loaded, it doesn’t start by playing all detectors at once!
Finally, add a script to the RayCast2D node, and add the following:
func _process(delta):
    # Sets the position of the sound effect to cast_to
    $Sound.position = cast_to

    # if collision is detected at cast_to position
    if(is_colliding()):

        # change position of rectangle to the collision wall
        var coll_point = get_collision_point()
        $Sound.position = to_local(coll_point)
What this function does is very simple. First, it sets the position of the sound effect to the cast_to variable of the RayCast2D. This is the furthest point that your node represents. If you set up the AudioStreamPlayer2D node as indicated above, it will be silent in this position. If there is no collision, you will therefore hear no sound. Next, it checks if the RayCast2D is colliding. If it is, it gets the collision point, and transforms it to local coordinates to set the position of the sound effect. This way, the positional sound effect moves closer to the player the closer the collision is to the player.
Finally, to make this work for the player, we return to the Player scene. First, add a Listener2D node - this node will allow us to hear the AudioStreamPlayer2D’s positional audio. Make sure that the current property is marked true. Next, we will add the scene we just created 4 times, and we will modify the cast_to point for each copy so that it extends out for each cardinal direction. For example, if we want to check the distance up to 50, we would set the cast_to point to:
- (50,0)
- (-50,0)
- (0,50)
- (0,-50)
You can even do this procedurally if you want.
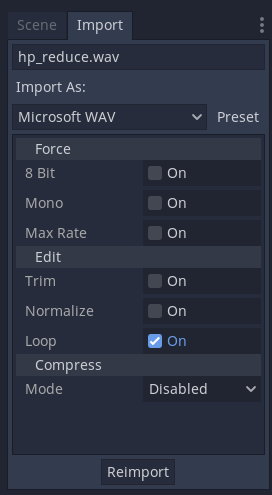
Finally, you will want to set each sound in each detector to be slightly different. This way a player can instantly know if a collision is approaching from the sides, behind or in front of them. You can do this by right clicking on the RayCast2D node, and mark “Editable Children” as true. Then you can change the stream for each sound effect. Make sure the audio sample you use loops! To do this, on the audio sample’s import tab, make sure that “Looped” is checked.
What is nice about this approach is that it is very easy to test if the collision detector is not working properly, without relying on sound. To do this, you can add a Polygon2D or ColorRect to the child of the AudioStreamPlayer2D to visually represent its position. That way you can see where the detectors are and can make adjustments accordingly.
One consideration to keep in mind when developing a collision proximity detector is whether you want the detectors to stay in the same orientation, or to rotate them with the player. This implementation simply keeps the detectors in the same orientation since the game is a top-down 2D game, but in 3D exploration games, you will want the detectors to rotate with the player so that they can detect what is directly in front of them.
Labels on the Overworld and NPCs
Note: This part of the tutorial assumes that you have already implemented TTS into your Godot game. If you haven’t already done this, check out my tutorial on this subject here.
In addition to collisions and footsteps, your player will need to know what certain places are as they are navigating around. By adding areas where a label is read off to the player with text to speech, a player can instantly know what they are interacting with and can especially help them build an internal map of locations of where they are navigating in your game. However, because of occasional lagginess of TTS on some platforms, this accessibility feature should not be used in places where precise speed or inputs are required. Try using sound effects or audio samples for these parts of your game instead. A similar implementation can be followed in these instances.
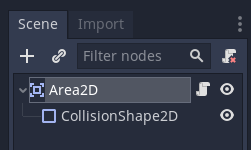
To do this, we can make a scene that inherits Area2D that has some additional exports. We will want this Area2D to have a label to read off when we walk over it, so let’s add the following to the top of the script file for this node:
export (String) var access_name = "Object"
By default, in this case, the name is “Object”.
Then, set the collision mask to whichever layer you wish to use for accessibility labels. This should obviously be different than the collision layer used for collisions or NPCs. Finally, we will want to also add a CollisionShape2D node to the Area2D as a child so that the area has a defined size and shape.
Now that we are done with building the label scene, we will need to make it so that the player will trigger these labels when they enter the area. To do this, we will need to add an Area2D with a CollisionShape2D to the player as well. This area represents the area that, if entering a label, will trigger reading the label’s name. Set its collision mask to include the label’s collision mask as well.
In order to detect if we entered the label’s area, we will need to add a way to detect this interaction. Thankfully, Godot provides Area2D with the handy signal area_entered(area), which will pass the area that was just entered. This will be emitted exactly when we need to trigger reading the label. With this signal added, we can add the following code:
# Triggered when a player enters an area2D, like a AreaLabel or near an NPC.
func _on_LabelDetector_area_entered(area):

    # if the area's parent has the property "access_name"
    if "access_name" in area:

        # You want to stop the TTS before reading anything
        TTS.stop()
        # Read off the Area2D's access name
        TTS.speak(area.access_name)
This will read off whatever you specified for access_name in your label when you collide with it on your map. Because we added access_name as an export, we can easily write the labels from the UI and describe anything we want on our map, and it will read it off whenever the area enters the label’s area.
It should be noted that this is an elementary implementation of this feature. In some cases, you might want to keep track of the labels that you’ve collided with, like in the case of overlapping labels, or you might want to prioritize certain kinds of labels (such as those attached to NPCs) over others, so that the player gets the most important information delivered to them. In my games, I like to use the same detection area that is used to open dialog boxes and interact with NPCs, so that the label can match the object that can be interacted with. Spend some time experimenting with this feature to see what works best in your own build.
3D Sound
3D sound, also known as positional sound, changes its tone and panning based on its position relative to a listener object, so that it imitates the effect of a sound in real life. In many games, 3D sound is used to produce ambiance and increase the auditory depth in a scene, but for blind players, 3D sounds are essential for navigation, because it can indicate where important locations are, and the unique arrangement of sound effects can help easily produce uniquely sounding areas to aid in navigation. On top of the 3D sounds you might already be using in your game, some additional sound effects can make your game really go a long way.
To add positional sound effects, you can use the AudioStreamPlayer2D node. Place these on the map where you might want to have additional sound effects. Additionally, you should attach them to objects like NPCs or other interactable objects, so that when players hear a specific sound effect, they know they are approaching an NPC. Try to use unique sound effects for different kinds of objects, so players know what they are approaching.
In most cases, you will want these sound effects to loop, so don’t forget to import the sound effects as looped.
General Sound Design Improvements
As you might have guessed, improving your sound design in general helps blind players tremendously. It helps them distinguish between various actions with sound cues alone, which can be easily learned. Here are some basic tips to improve the sound design of your game:
- Try to use a unique combination of sound effects for every action. For example, in the original Pokemon games, every attack has a nearly unique combination of sound effects, allowing blind players to distinguish between them without seeing what is going on.
- Use a wide variety of sound effects throughout the game. Some tools like Labchirp or Bfxr can easily randomize and mutate sound effects to give you plenty of variety.
- Use sound effects consistently with specific actions. This allows sound effects to differentiate between each other as actions.
- Overall, providing an emmersive audio experience with your game makes your game not only just playable, but enjoyable, to blind people.
Closing Notes
It’s important to remember that despite following this guide, you still don’t truly know if your game is blind accessible until you test it with blind people. Only then can you know if your game really makes the cut. Blind people will alert you to any gaps or difficulties with their experience, and will help you design an overall better audio-based game. What you should do is share your game on blind communities like audiogames or other similar communities, or find an accessibility tester to pay for extensive testing. Do not distribute your game as “blind accessible” until you’ve at least had one blind person experiment and give feedback to you about it.
posted on 06:44:05 AM, 02/27/23 filed under: game [top] [newer] | [older]